Pages: 1 2
CUDA Kernel code
#define C_PI 3.141592653589793238462643383279502884197169399375

void __global__ SwirlCu(int width, int height, int stride, unsigned int *pRawBitmapOrig, unsigned int *pBitmapCopy, double factor)
{
	// This function effectively swirls an image
	// This CUDA kernel is basically the exact same code as the CPU-only, except it has a slightly different setup
	// Each thread on the GPU will process exactly one pixel
	// Before doing anything, we need to determine the current pixel we are calculating in this thread
	// Original code used i as y, and j as x. We will do the same so we can just re-use CPU code in the CUDA kernel

	int i = blockIdx.y * blockDim.y + threadIdx.y;
	int j = blockIdx.x * blockDim.x + threadIdx.x;
	// Test to see if we're testing a valid pixel
	if (i >= height || j >= width) return;	// Don't bother doing the calculation. We're not in a valid pixel location

	double cX = (double)width/2.0f;
	double cY = (double)height/2.0f;
	double relY = cY-i;
	double relX = j-cX;
	// relX and relY are points in our UV space
	// Calculate the angle our points are relative to UV origin. Everything is in radians.
	double originalAngle;
	if (relX != 0)
	{
		originalAngle = atan(abs(relY)/abs(relX));
		if ( relX > 0 && relY < 0) originalAngle = 2.0f*C_PI - originalAngle;
		else if (relX <= 0 && relY >=0) originalAngle = C_PI-originalAngle;
		else if (relX <=0 && relY <0) originalAngle += C_PI;
	}
	else
	{
		// Take care of rare special case
		if (relY >= 0) originalAngle = 0.5f * C_PI;
		else originalAngle = 1.5f * C_PI;
	}
	// Calculate the distance from the center of the UV using pythagorean distance
	double radius = sqrt(relX*relX + relY*relY);
	// Use any equation we want to determine how much to rotate image by
	//double newAngle = originalAngle + factor*radius;	// a progressive twist
	double newAngle = originalAngle + 1/(factor*radius+(4.0f/C_PI));
	// Transform source UV coordinates back into bitmap coordinates
	int srcX = (int)(floor(radius * cos(newAngle)+0.5f));
	int srcY = (int)(floor(radius * sin(newAngle)+0.5f));
	srcX += cX;
	srcY += cY;
	srcY = height - srcY;
	// Clamp the source to legal image pixel
	if (srcX < 0) srcX = 0;
	else if (srcX >= width) srcX = width-1;
	if (srcY < 0) srcY = 0;
	else if (srcY >= height) srcY = height-1;
	// Set the pixel color
	// Since each thread writes to exactly 1 unique pixel, we don't have to do anything special here
	pRawBitmapOrig[i*stride/4 + j] = pBitmapCopy[srcY*stride/4 + srcX];
}
Results
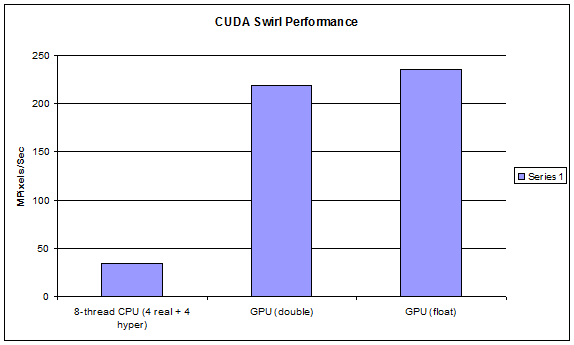
Even though there is a memory copy overhead for CUDA, the CUDA code runs substantially faster than the CPU code. The GPU used is a GTX 470, and the CPU is an Intel core-i7 930, both at stock speeds. In fact, the CUDA code, including memory transfer overhead, is 6.38 times as fast as the CPU. The 32-bit floating point CUDA code ran 6.8673057 times as fast as the CPU. Also keep in mind that the CPU code is already using openMP to use all 8 threads available on the CPU. In short, for image processing applications, CUDA can achieve a massive speedup with little programming effort.
Advanced image processing with CUDA
The code in this tutorial is fairly basic, and requires minimal resources per thread. However, each CUDA thread can utilize plenty of resources just like a CPU can. In our next tutorial, we show some more advanced image processing with CUDA, and demonstrate speedups of code that uses a large amount of local memory per thread.
Pages: 1 2
